Thursday, October 10, 2013

Session 9: Implementation of DRBD

Exercise Description: The activity will focus on the creation of a new partition on the computer's hard disk, and the installation and configuration of DRBD.
- Check the current partition of the hard disk using gparted. To install. $ sudo apt-get install gparted.
- Create a new partition in the hard disk with size of 2GB. Use the unallocated partition to get the 2GB space. Name it drbd.

 Setup and Configure DRBD


Monday, September 2, 2013

Session 8: Distributed Replicated Block Device (DRBD)

OVERVIEW
Distributed Replicated Block Device (DRBD) is composed of block devices that form high availability (HA) cluster. 
Distributed Replicated Block Device (DRBD)
The illustration shows two servers (active and passive nodes) that form HA cluster. Each server contains file system, buffer cache, disk scheduler, disk drivers, TCP/IP stack and network interface card (NIC) driver.The black arrows shows the data flow for each components. The orange arrows show the data flow as the DRBD mirrors the data of the high available service of the active node to the passive node of the HA cluster.
[Reference: http://www.drbd.org/] 


PROBLEM STATEMENT
The installation of DRBD will be executed next laboratory session. The task today is to install and configure mysql server and php5. Another task is to create a dynamic web page with the following functionalities:
 - Login and Logout
 - Add user
 - Edit user
 - Delete user
 **A user needs a username and password.


GUIDES IN SOLVING THE PROBLEM
Installation and Configuration of MYSQL and PHP
To install MYSQL, type $ sudo apt-get install mysql-server on your terminal.
Installation of MYSQL

Configuration of MYSQL
To test if MYSQL is running, type this command, $ sudo netstat -tap | grep mysql.
MYSQL testing

To install PHP, type this command, $ sudo apt-get install php5.
Installation of PHP

Creating Database
After the installation of MYSQL and PHP, building of the database to be used can now be done. To start MYSQL using terminal, type this commande: $ mysql -u root -p.
Start MYSQL
We need our knowledge in the CMSC 127 class to create the database =)
Building the database

Creating the Webpage
The webpage should accept username and password from user. Also, the username and password can be edited by the user. It can also be deleted. There should be login and logout mechanism on the webpage.

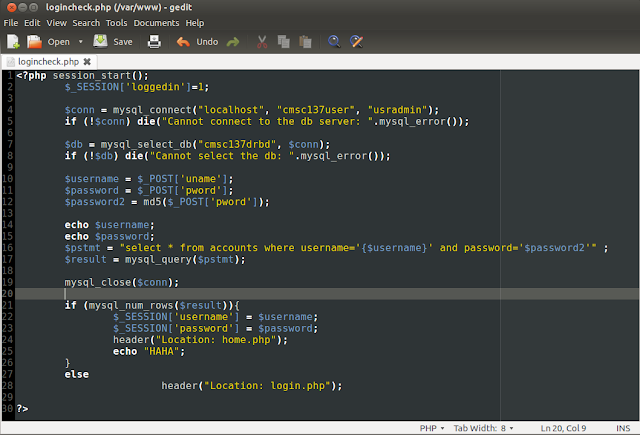
The following images are the scripts of the webpage.
1. The hompage.
Homepage script
2. The login part of the webpage.
 Login.php only get the username and password of the user.
Logincheck.php validates the username and password, and add it to the database.

3. Adding a user.
The add functionality works when the user click the link 'Add User'. It will prompt the user to give new username and password of the new user to be added. Then, it will be added to the database.

4. Editing the username and password of a user.
There is "Edit User" link that will allow the user to edit his/her username or password. Also, after changes are made, the database will be updated.

5.The logout part of the webpage.


LEARNING AND INSIGHTS + CONCLUSION
This activity brings back memories because we create databases without using xampp or wamp. Also, we created webpages like the old days. It refreshes our memories on CMSC 127 days where consoles are used in creating databases. We racked our brains for this. =)

Monday, August 26, 2013

Session 7: Implementation of HA and CRM

OVERVIEW

The High-Availability cluster and the Cluster Resource Manager are responsible for the recovery of nodes in case of failure in the network occurs. The concept of Active and Passive Cluster will be discussed in this activity.


Active/Passive Cluster

The Active/Passive Cluster works when a node (active node) fails, the passive node will assume the role of the failed node, and the service will continue. 
Two computers (servers) are needed in this cluster. One computer will serve as the active node, while the other is the passive node. Once the process execution of the active node fails, the passive node will take over of the execution, so that the failure will never occur.
Active/Passive Cluster


PROBLEM STATEMENT

The activity needs to be performed by at least two people. Two to three computers are needed to execute the activity. The concept of IP configuration will be of help because assigning IP addresses and names to each computer is needed, and a virtual IP address to a computer that will act as a server. The Active/Passive Cluster will be use.


GUIDES IN SOLVING THE PROBLEM

Configuring the needed configuration files

To be able to configure two servers using Apache and Heartbeat to communicate with a client or browser, we need to edit several configuration files. And these configuration files are as follows:


ha.cf

The ha.cf configuration file can be found at /etc/ha.d directory. Just type $ sudo gedit /etc/ha.d/ha.cf to edit the file. The basis of the contents of ha.cf is from this site http://www.zivtech.com/blog/setting-ip-failover-heartbeat-and-pacemaker-ubuntu-lucid. This file should contain the name of the two servers needed.
Edit ha.cf configuration file
authkeys
The authkeys configuration file can be found at the /etc/ha.d directory. To edit this file, type $ sudo gedit /etc/ha.d/authkeys on the terminal. The basis of the contents of this file is from this site http://opentodo.net/2012/04/configuring-a-failover-cluster-with-heartbeat-pacemaker/
Edit authkeys file
-haresources

The haresources file can be found at /etc/ha.d directory. It contains the name of the server assigned to be the active node, and the virtual IP address needed.
Edit haresources file
/etc/hosts

The /etc/hosts file should contain the name of the two computers which will act as the two server with its distinct IP address. Also, the virtual IP address or alias of another server holding the said two servers should be specified along with its name. To edit this file, type $ sudo gedit /etc/hosts.
Edit /etc/hosts file
/etc/hostname

The /etc/hostname file should contain the name of the computer you are using. It is neccessary for the ha.cf and /etc/hosts files.To edit this file, type $ sudo gedit /etc/hostname.
Edit /etc/hostname file

Test the Active/Passive Cluster

Try the following commands to test your set-up:

- Check if Apache is running.

   Command: $ sudo /etc/init.d/apache2 start
Start Apache
- Check if Heartbeat is running.

  Command: $ sudo /etc/init.d/heartbeat restart
Restart Heartbeat
- Try to access the virutal IP address (10.0.5.66) in the browser using another computer. It should display the web page of the active node (server1).
Web Page of server1 (Active Node)
- Disconnect the LAN cable of the active node (server1). Refresh the web page. It should display the web page of the passive node (server2). 
Web Page of server2 (Passive Node)

LEARNING AND INSIGHTS

Configuring the configuration files is a bit challenging because we didn't know how to do it. Thanks to the power of the Internet, we were able to do it (barely). 

Through patience, we were able to start heartbeat successfully. Also, we were able to access the active server via the virtual IP address. And if we disconnect the LAN cable of the active server, the browser can display the page of the passive server. We were so overwhelmed that we were able to do this after two lab meetings. T__T

***Lesson learned (for me): In order to avoid problems, the server should be regularly restarted so that changes can be made on the server.


CONCLUSION
The activity, for me is so difficult. It is difficult to accomplish because once you have made mistakes on the configuration files, you need to check all those files and trace what was wrong. Though it is kinda confusing, we were able to fulfill the tasks needed in this activity. We barely surpass the trial and error on all the computers in the laboratory to have a better access on our virtual server.


Monday, August 12, 2013

Session 6: High-Availability and Cluster Resource Management

OVERVIEW
High-Availability, commonly referred as HA, and Cluster Resource Manager or CRM both facilitate the monitoring of the system's hardware and software failures. They works when one of the connected hosts experience failure, the other will act as a substitute to work on the process of that failed host is working on. So basically, HA and CRM will salvage the running process of a failed certain node via the other node connected to that said failed node. This activity will focus on the concepts of HA and CRM, and on their processes on how they work on the computers.


PROBLEM STATEMENT
A research about HA and CRM is needed to conduct this activity. Definitions, installation and configure, and diagrams of both processes are needed to understand them thoroughly. After the research, both HA and CRM should be installed in the student's computer for future purposes concerning both processes.


GUIDES ON SOLVING THE PROBLEM
HIGH_AVAILABILITY (HA) with Heartbeat
*Definition and Technicalities
High-Availability (HA) refers to a system or a component that is continuously operational for a desirably long length of time. According to Wikipedia, HA is a system design approach and associated service implementation that ensures a prearranged level of operational performance will be met during a contractual measurement period. It can be measured relative to "100% operational" or "never failing". HA focuses on the backup and failover processing and data storage and access. Data storage can be redundant array of independent disks (RAID) or storage area network (SAN).

*Installation and Configuration of Heartbeat
I used the command $ sudo-apt get install heartbeat to install Heartbeat in my computer.
Installation of Heartbeat

*Heartbeat Configuration Files
The configuration files can be found at /etc/ha.d directory.
Some configuration files are as follows:
ha.cf : It is the configuration file for Heartbeat cluster messaging layer. It lists the communication facilities enabled between nodes, enables or disables certain features, and optionally lists the cluster nodes by host name.

authkeys : It is the authentication file for Heartbeat cluster messaging layer. It enables Heartbeat to securely authenticate cluster nodes.


*Illustrations and Diagrams
High-Availability Cluster Network Diagram
This diagram shows the HA cluster. It involves two nodes (at least) to support continuous service if a node fails. The other node will support the node's failure, and continue the service.
To be able to run HA cluster environment, an application must be able to use shared storage (SAN/NAS), must store all of its state until the last state before its failure at a non-volatile shared storage, must have a command line interface or scripts to control the application, and must not corrupt data if the application crashes.


CLUSTER RESOURCE MANAGER (CRM) with Pacemaker
*Definition and Technicalities
Cluster Resource Manager (CRM) monitors the system for both hardware and software failures. Pacemaker, a cluster resource manager detects and help recover machines and applications from failures. It supports maximum availability of a cluster by detecting and recovering from node and resource-level failures by making use of the messaging and membership capabilities provided by a cluster infrastructure (like Heartbeat). Pacemaker automatically recover your application and make sure it is available from one of the remaining machines in the cluster. After failure, it uses advanced algorithms to quickly determine the optimum locations for services based on relative node preferences and requirement with other cluster services.

[Reference: clusterlabs.org/wiki/Pacemaker]

*Illustrations and Diagrams
This type of configuration allows two nodes to be active or passive using Pacemaker and DRBD, which is cost-effective solution for many high-availability situations. Once the active nodes fail, passive node will act as its substitute.

*HA and CRM to a 3-year old child (Simple Explanation)
High-Availability Definition
High-Availability works, for example, when your toy car or your toy house castle lasts for how many years of you playing with it. It means that the parts of that toy car or toy house castle are well-designed fort to last that long, given that you've played with it very well.

Cluster Resource Manager Definition
For example, when you play your music box or the music player in your house, and suddenly it makes a screeching sound. And then after a few seconds or a few minutes, it went back to its normal behaviour, and play the music beautifully. That's how Cluster Resource Manager works. It recovers from its failure to play the music normally once the music or the music player detects what is wrong with its mechanism.

*Note: The implementation of HA and CRM will be tackled next laboratory session.


LEARNING AND INSIGHTS
Apache, Heartbeat, and Pacemaker create High-Availability on web servers. They make sure that when one node in a network fail to execute a process, another node from that same network will continue to execute that process.  In this sense, it can be implied that the process needed to be execute will push through.


CONCLUSION
Basically, the activity is to research the given questions in the laboratory, and install and configure Heartbeat and Pacemaker in the computer. Though it is difficult to explain the technicalities of the processes in simple words, it can be done because of the help of the diagrams showing how HA and CRM works.

Tuesday, July 30, 2013

Session 5: Apache Web Server

OVERVIEW
Apache Web Server
Apache offers compression methods the help reduce the size or weight of web pages served over HTTP. Also, it supports pass authentication, digital certificate authentication, graphical user interface (GUI), and virtual hosting. Apache's goal is not to be the fastest web server, but to have a high performance as a web server.


PROBLEM STATEMENT
The goal of the activity is to research on how to successfully install and configure Apache to the computer, and the configuration files it has. After the installation and configuration, the computer should display a webpage that says "It works" when accessed using localhost.


GUIDES IN SOLVING THE PROBLEM
Installation and Configuration of Apache
Process in installing and configuring Apache:
1. Installation begins by simply downloading a version of Apache at apache.org.

2. The downloaded version is in the form of .tar.gz, so we needed to extract it.
                   $ gzip -d httpd-NN.tar.gz
                   $ tar xvf httpd-NN.tar
 (*Note: NN must be replaced by the version number of the Apache you've downloaded.)
After the extraction, the current directory must be set to where the Apache source code is before proceeding to the compiling of the server.

*[In the laboratory, I used the $ sudo apt-get install apache2 command to install Apache]

3. To configure Apache, type $ ./configure --prefix=PREFIX. PREFIX must be replaced with the file system path where the server should be installed. The default path is /usr/local/apache2 if PREFIX is not specified.

4. To build different modules of Apache package, use $ make.

5. To install package under the configured installation PREFIX, use $ make install.
Installation of Apache
6. After the installation, and configuration, try to access he default web page of the server. Use the localhost to access this page. The web page should say "It works!" like the screenshot below. It means that the installation of Apache is successful.
It Works! Installation Successful
7. And to test if Apache is running, use this command:
               $sudo /etc/init.d/apache2 start
Starting Apache

Apache Configuration Files
The configuration files can be found at /etc/apache2.
Some of the configuration files are as follows:
apache2.conf : It is the main Apache2 configuration file. It contains the settings that are global to Apache2.

httpd.conf : Historically, it is the main Apache2 configuration file, named after the httpd daemon. Now the file is typically empty, as most configuration option has been moved to some directories. The file can be used for user specific configuration options that globally affect Apache2.

ports.conf : It contains the directories that determine which TCP ports Apache2 is listening on.
[Reference: https://help.ubuntu.com/lts/serverguide/httpd.html]


LEARNING AND INSIGHTS
Basically, the installation of the Apache in the laboratory is too slow, maybe because of the internet connection is too slow, which is needed to download necessary files.


CONCLUSION
The necessary requirements in this activity is met. The research on Apache helps  a lot on its installation and configuration process.


Session 4: DHCP

OVERVIEW
Dynamic Host Configuration Protocol (DHCP)
DHCP uses a remote server to control the network configuration of the hosts (computers). It uses the client-server model

DHCP messages used to establish a connection between host and server:
- DHCPDISCOVER is used to initiate an interaction between the host and the server. The host initiates the action by sending this message to the server, and it is the start of the process.
- DHCPOFFER is the reply of the DHCP server to the client who send a request to the server. It contains the network information to be assigned to the client such as the host's IP address, subnet mask, and gateway address. 
- DHCPREQUEST is the client's response to the DHCPOFFER message of the server. It indicates the acceptance of the network configuration given by the server to the client.
- DHCPACK is the message of acknowledgement that the server permitted the client to use the network configuration sent earlier using the DHCPOFFER message. Also, this is the end of the process started with the DHCPDISCOVER message.

Step-by-Step DHCP Process
The illustration shows how DHCP works. The processes was explained above using the DHCP messages needed to establish connection between a client and a server.

Monday, July 29, 2013

Session 3: DNS Server

OVERVIEW
Domain Name System (DNS)
Domain Name System or DNS, can also be referred as Domain Name Service is the mapping of a domain name to its IP address. Example of this mapping, Domain Name: uplb.edu.ph <=> IP Address: 202.92.144.108
So when you type thee IP address on the web browser, it will only redirect the page to the UPLB homepage, same as when you type the domain name.

Domain Name System Server (DNS Server)
DNS Server's purpose is to collect the domain name mapping available in the server.
Process of DNS Mapping:
     - Web Browser sends request for a domain name or IP address to the DNS Resolver. The DNS Resolver is built-in in operating systems.
     - DNS Resolver will contact the DNS Server to locate the domain name or IP address on its database.
     - If the DNS Server already locate the domain name or IP address, it will send the domain name or IP address back to the Web Browser.
     - Web Browser can now display the content of the domain name or IP address.

Concepts/Functionalities of DNS Server
CACHING -  storing mapping of domain name to a local copy.
REDUNDANCY - the mapping can be distributed to other location.


PROBLEM STATEMENT 
The goal of this activity is to create a DNS server that will accommodate five different hosts (computers), and to be able for the other hosts to communicate with each other using the established DNS server.


GUIDES IN SOLVING THE PROBLEM
To be able to create a DNS server, the following steps or process should be followed.
Steps/Process:
1. Install the package bind using this command:
                 $ sudo apt-get install bind9.
2. Go to the directory where bind is $ cd /etc/bind.
3. Edit the named.conf.local file.
Edit named.conf.local file


The named.conf.local file will be responsible for the creation of the domain name where all the hosts will be connected. The IP address of the domain name will also be included in this file.

4. Create a forward zone file $ sudo vi db.bioneel.com.
Creation of the forward zone file named db.bioneel.com
The forward zone file named db.bioneel.com contains the mapping domain name to the IP addresses of the hosts that will connect to domain bioneel.com.

5. Create the reverse zone file $ sudo vi db.192.168.1
Creation of the reverse zone file named db.192.168.1
The reverse zone file named db.192.168.1 contains the mapping of the IP addresses to the domain name of the hosts that will connect to the domain bioneel.com.

6. Edit the resolv.conf file located in the etc folder.
Edit the resolv.conf file in the etc folder
The resolv.conf file should contain the domain name where the hosts will connect named as bioneel.com, and the IP address of your computer that will connect to the server.

7. Check the forward zone and reverse zone file if there errors using the named-checkzone
Use the named-checkzone to check errors on the forward zone and reverse zone files
$ named-checkzone bioneel.com db.bioneel.com will check the forward zone file db.bioneel.com for errors. If the terminal return an OK message, then there exist no errors on the file.

$ named-checkzone 192.168.1 db.192.168.1 will check the reverse zone file db.192.168.1 for errors. If the terminal return an OK message, then there exist no errors on the file.

8. After checking the errors, use $ sudo /etc/init.d/bind9 restart to ready the server for communication.

9. After the terminal return the message OK, try to ping the computers connected to the server. (*Note: Only the specified hosts in the forward zone and reverse zone files are capable of connecting to the server.)

 **When trying to ping the other computers using its IP address, i.e. ping 192.168.1.7 the computer will be unreachable. But, when trying to use the domain name of the computer, i.e. ping mbgaspar.bioneel.com, there sis a connection established.


LEARNING AND INSIGHTS
Establishing connection with the other computers using the concept of the DNS server is really hard (based on what we experienced in the laboratory). Concepts on establishing a server should be fully understand. On our case, we cannot connect to each other at first because we all have different domain name (main domain name for connecting the other computers). The result is that we cannot communicate with each other. So when we fixed this problem, we can now establish connection to each other =)
***CONFESSION:
There are no screenshots on the supposed connection established between my computer to the other computers. But, I have tried it on the original week this activity was conducted. I haven't taken the screenshots because it is already time. We needed to already get out of the room because the next class is already there. But, I have tried to established connection to other computers on the last minutes of the class. I really do :D


CONCLUSION
The activity shows the student on how difficult it is to establish connection on five different hosts using the setup DNS server. Even though difficulties arise, the activity pushed through because everyone have the will to share their knowledge with everyone to have the correct output. It is important that the concepts on DNS server are fully understood to complete this activity.